如何搬迁主控
注意:
- 建议选择业务低峰期操作;迁移过程中请勿在后台进行其他配置修改,以免迁移后丢失新增的数据。
- 迁移之前,登录 cdnfly.com 后台,点击"授权IP下载文件"按钮,输入新的主控IP,以便允许下载主控文件来迁移。
旧主控能打开的情况
1. 旧主控后台执行迁移操作
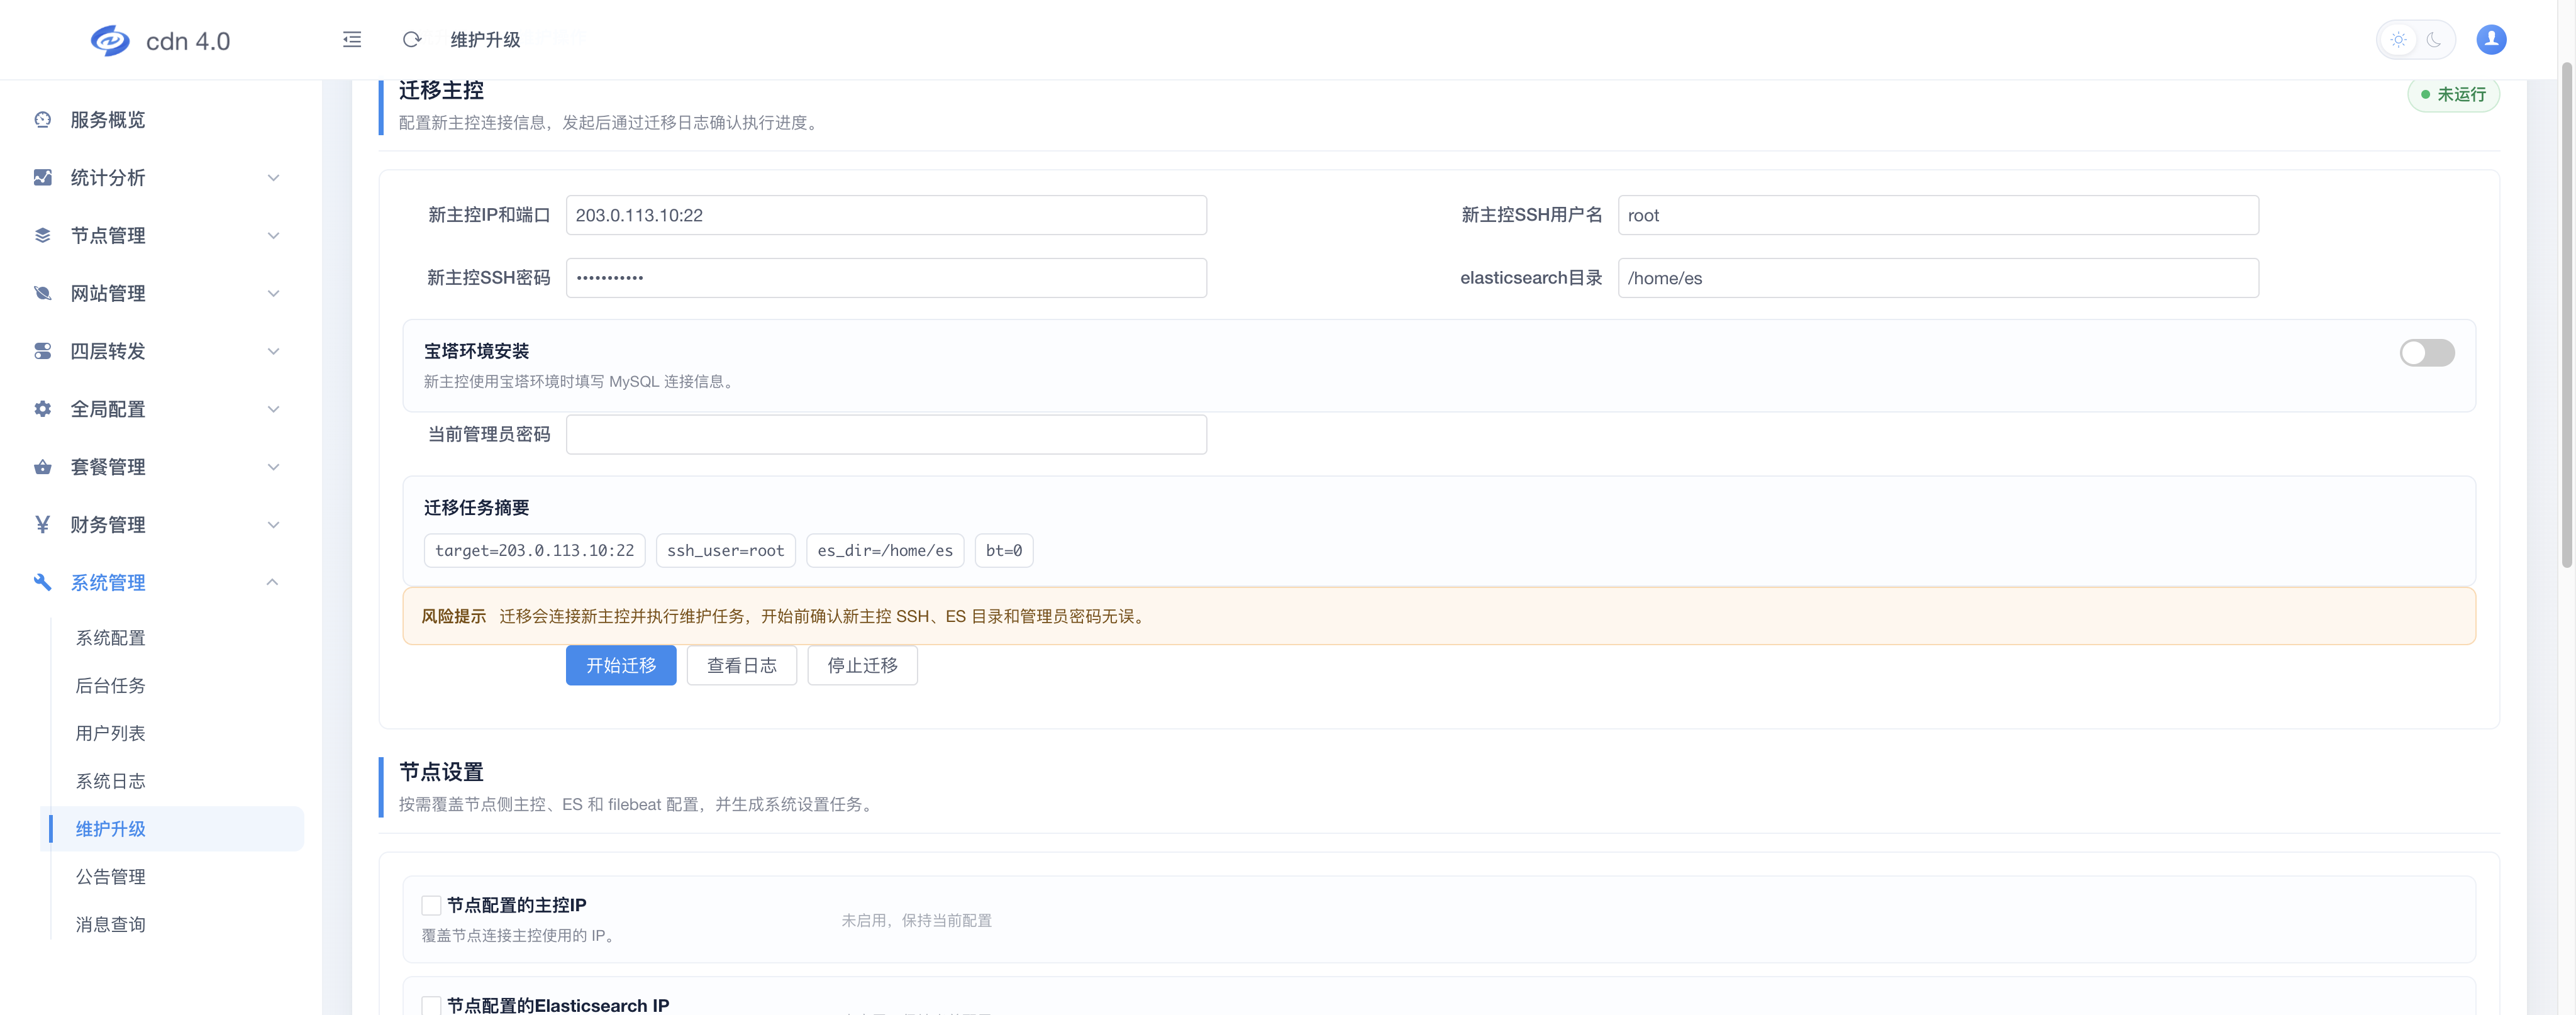
登录旧主控后台,进入 系统管理 → 维护升级 → 维护操作 选项卡,在 迁移主控 区域填写新主控信息:
- 新主控IP和端口(如
203.0.113.10:22,只填 IP 时端口默认 22) - 新主控SSH用户名、SSH密码
- elasticsearch目录(新主控的 ES 数据目录,如
/home/es) - 如新主控使用宝塔环境,打开 宝塔环境安装 开关并填写 MySQL 连接信息(需先按主控安装文档完成宝塔部分操作)
- 当前管理员密码
点击 开始迁移,随后点 查看日志 确认迁移进度,如图:
2. 替换节点的主控IP
迁移完成后,在同一页面的 节点设置 区域,勾选 节点配置的主控IP 并填入新主控IP(如 ES 也在主控上,可同时勾选 节点配置的Elasticsearch IP;如需同步主控域名/端口或重置 filebeat,勾选对应项),填入当前管理员密码后点击 创建设置任务,如图:
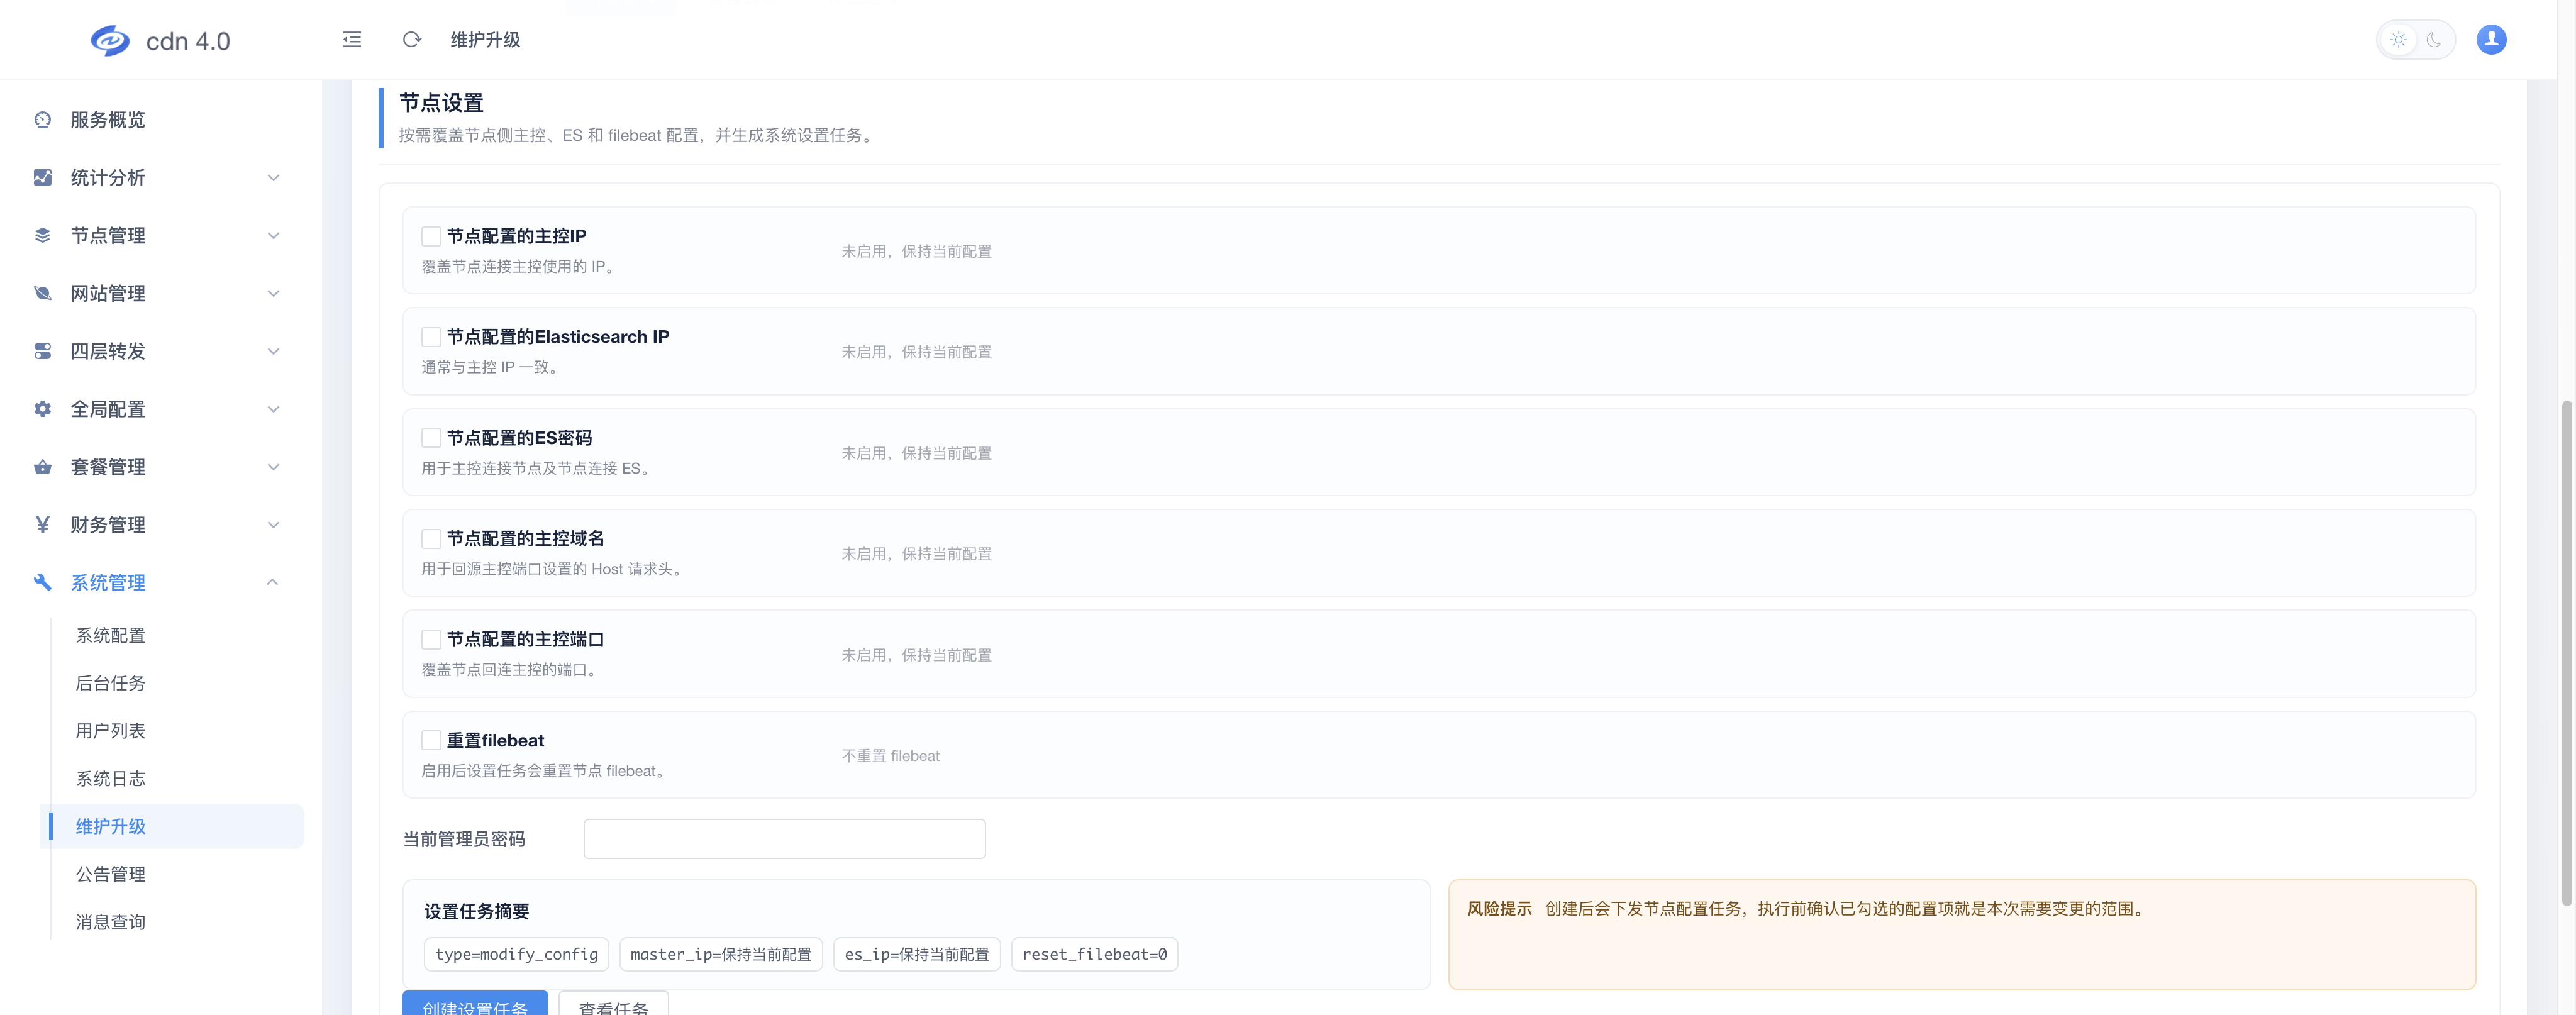
点击 查看任务,待全部节点的设置任务执行完成后,进行下一步。
3. 替换授权IP
登录 cdnfly.com 官网后台,把授权中的主控IP替换为新的。
4. 登录新主控后台检查
登录新主控后台,在首页 Agent状态 处点击 立即检查,查看检查任务是否正常。
5. 关闭旧主控
登录旧主控服务器,执行如下命令停止并禁用主控服务:
systemctl stop master-api.service master-task.service;
systemctl disable master-api.service master-task.service;
旧主控无法打开的情况
1. 备份旧主控数据
在旧主控执行如下命令开始备份:
cd /root;
curl -fL -m 30 https://dl2.lotcdn.com/cdnfly/backup_master_v6.sh -o backup_master_v6.sh || curl -fL -m 30 https://us.lotcdn.com/cdnfly/backup_master_v6.sh -o backup_master_v6.sh;
chmod +x backup_master_v6.sh;
./backup_master_v6.sh;
备份脚本会读取 /opt/cdnfly-go/conf/config.yaml 中的数据库配置,在 /root 下打包生成 cdn.sql.gz。把这个文件传输到新主控的 /root/ 目录:
cd /root;
scp cdn.sql.gz root@新主控IP:/root/;
2. 在新机器安装好主控程序
首先登录 cdnfly.com,更新授权为新主控IP,并清空机器码。
在旧主控上查看当前版本:
grep -A2 'version:' /opt/cdnfly-go/conf/config.yaml;
输出中 name: v6.0.0 即为版本号。
登录新机器,按主控安装文档安装相同版本:
curl -fL -m 30 https://dl2.lotcdn.com/cdnfly/master_v6.sh -o master_v6.sh || curl -fL -m 30 https://us.lotcdn.com/cdnfly/master_v6.sh -o master_v6.sh;
chmod +x master_v6.sh;
./master_v6.sh --ver v6.0.0;
其中 v6.0.0 替换成上一步查到的主控版本号。使用宝塔/外部 MySQL 时,按安装文档追加 --no-mysql --mysql-ip ... --mysql-db ... --mysql-user ... --mysql-pass ... 等参数。
3. 登录新主控,恢复备份、config.yaml 并初始化ES
1)恢复数据库:
cd /root;
curl -fL -m 30 https://dl2.lotcdn.com/cdnfly/restore_master_v6.sh -o restore_master_v6.sh || curl -fL -m 30 https://us.lotcdn.com/cdnfly/restore_master_v6.sh -o restore_master_v6.sh;
chmod +x restore_master_v6.sh;
./restore_master_v6.sh /root/cdn.sql.gz;
2)恢复 config.yaml 配置文件:
scp root@旧主控IP:/opt/cdnfly-go/conf/config.yaml /opt/cdnfly-go/conf/config.yaml;
systemctl restart master-api.service master-task.service;
3)初始化 ES(仅使用本机 Elasticsearch 的主控需要,此操作会删除原有索引数据):
cd /tmp;
curl -fL -m 30 https://dl2.lotcdn.com/cdnfly/int_es_v6.sh -o int_es_v6.sh || curl -fL -m 30 https://us.lotcdn.com/cdnfly/int_es_v6.sh -o int_es_v6.sh;
chmod +x int_es_v6.sh;
./int_es_v6.sh /home/es;
其中 /home/es 为 ES 的数据目录,可更改成其它目录。
4. 替换节点的主控IP
推荐在新主控后台使用 维护升级 → 维护操作 → 节点设置 统一下发(见上文第 2 步)。如果节点已无法连接旧主控,也可在每台节点上手动执行:
new_master_ip="这里替换为新主控IP";
sed -i "s/^  ip:.*/  ip: $new_master_ip/" /opt/cdnfly-go/agent/conf/config.yaml;
sed -i "s/hosts:.*/hosts: [\"$new_master_ip:9200\"]/" /opt/cdnfly-go/agent/conf/filebeat.yml;
grep -rl "旧主控IP" /usr/local/openresty/nginx/conf/ 2>/dev/null | xargs -r sed -i "s/旧主控IP/$new_master_ip/g";
ps aux | grep [/]usr/local/openresty/nginx/sbin/nginx | awk '{print $2}' | xargs kill -HUP || true;
systemctl restart agent-socket.service agent-task.service filebeat.service;
说明:config.yaml 中 master.ip(连接主控)和 log.ip(ES 地址)通常都是主控IP,上面的 sed 会一并替换;旧主控IP 替换为迁移前的主控IP。
5. 迁移完成
登录新主控后台,在首页 Agent状态 处点击 立即检查,如果没有错误,表示主控迁移完成。